Showing posts with label Cake. Show all posts

Monday, February 22, 2010

Coconut Strawberry Cupcakes

Small Strawberry and Coconut Cakes

A  very BIG  HELLO to all of you after almost  a million years. Yes that's what it feels like to me today. Last post I put up was in October last year and after that I have kind of gone into a winter sleep where blogging is concerned. But that's only where blogging is concerned. A lots happened since then. The first break happened because my parents were here to visit us and ofcourse with them here obviously blogging was the last thing I could find time to do. They had a great stay and we did the touristy trips with them all over UK.


After they left I got a job. YES A JOB!!!! Isn't that great?  I now work in a Primary School as a Learning Support Assistant and I am happy with  my job. That's the second reason why I am not actively blogging. I am ofcourse cooking and entertaining but I now cook mostly in the evenings and my food pics taken in the evening are horrible. I have to also admit that many a times the food is eaten and polished off before I can photograph it. So no blog posts!


Then in Dec I went on my annual trip to India for 5 weeks. I spent the most fabulous 5 weeks there eating everything that I had missed in the last one and half year. It was  simply great being back in Pune and riding my Honda Activa and driving the Santro.  We had a blast and my son loved it. In his words "Aai INDIA ROCKS". What else did I need to hear.


But now I have been back since one month and things have fallen back into a routine with school and office and other activities and I am definitely back on the blogosphere.


A week back I baked these little cakes from a recipe from one of my most used books and that is The Pleasures of Vegetarian Cooking by Tarla Dalal.  Now in the book these cakes are called Madeleines, but I prefer to call them just "little cakes" as traditionally a Madeleine is a  shell shaped cake eaten at tea time and which is baked in special shell shaped moulds, so for me these are just small cakes or cup cakes which have a delicious coating of strawberry jam and dessicated coconut. These cakes come out beautifully each and every time and no matter how many I make they are never enough.


Note: These cakes need to be ideally baked in individual cup cake moulds, but I do not have those and baked them in a muffin tray which worked just fine


I have followed the recipe from the book word to word, and here it is for you.


Ingredients:
  • 115 gms sugar
  • 115 gms butter
  • 2 medium eggs
  • 115 gms self-raising flour
  • 1/2 tspn lemon or vanilla essence (I used vanilla)
  • 1/2 tea cup milk approx
  • red jam (I used strawberry jam)
  • dessicated coconut
Method:
  • Sieve the flour
  • Cream the butter and sugar very well  until light and creamy
  • Beat the eggs well
  • Add a little of the egg mixture to the butter and sugar and beat well. Gradually go on adding eggs beating well  all the time. If the mixture curdles, add a little flour ,mix well and then continue adding the eggs.
  • Add the sieved flour and enough milk till the batter has a dropping consistency.
  • Add the essence.
  • Grease and dust your muffin tray or the cake moulds and fill upto 3/4 with the cake mixture.
  • Bake at 400 deg F for around 20 mins.
  • Cool the cakes
  • Warm the jam and brush the cakes  with the melted jam.
  • Roll the cakes in dessicated  coconut.


The cakes are now ready to eat. Try these they are simple to make and taste awesome

Tuesday, December 02, 2008

Quick Coffee Cake in a Microwave

Coffee Cake Anyone?

For past few days hubby and son keep craving something sweet after meals. I mean my son has always favoured sweet more than spicy but hubby dear is going even further and asking for desserts everyday. It's quite unusual for him. It's probably all the Christmassy ads on TV showing all different kinds of yummy desserts that is causing these cravings. It's also maybe because it's winter it really feels nice to tuck into a hot dessert after dinner while sitting warm and cozy in front of the telly.

So I just went out and bought a few ready to eat desserts that can be like warmed up in the microwave for a few seconds. But then I also browsed the internet for some easy to make desserts and came across some pretty good stuff. What caught my eye this time was this very fast to make Coffee Cake that can be baked in 5 mins flat in the microwave. I am great fan of "coffee anything" and immediately got down to making it.

Iced Coffee Cake

There was also a butter frosting in the recipe and I had my usual doubts about it. I love frosting in moderation as long as it is not very very sweet and does not completely overpower the original taste of the cake. But I went ahead and made it anyway. I am glad I did. The coffee flavoured butter icing was delicious. It really enhanced the taste of the entire cake and the cake tasted even better the next day. This recipe makes a lot of batter so I made 2 cakes instead of one large one

Here's the recipe:
Preapare two microwave proof dishes by greasing with butter and dusting them with flour.

Ingredients:
225 gms or 1 cup salted butter (butter has to be really soft at room temp)
225 gms or 1 cup sugar
225 gms or 2 cups plain flour
5 eggs (also at room temp)
45 ml or 3 tblspns coffee essence
1 tblspn cocoa powder (this was my addition to the recipe as coffee and cocoa really enhance each other
1 tspn baking powder

For the frosting:
2 tblspns coffee essence
1 tblspn instant coffee dissolved in 2 tblspns on water ( this is also something I added to the recipe to the make the frosting brown in colour)
175 gms butter
150 gms icing sugar
Bold

Method:

  • Beat the butter and sugar together until really soft and light.
  • Add to this the eggs one by one beating well after adding each egg
  • Add the coffee essence and cocoa powder next and stir in well
  • In another bowl sieve the flour and baking powder together
  • Slowly fold in the flour completely and evenly into the wet mixture. Do not over mix.
  • Pour the mixture equally into the 2 bowls and bake one at a time in the microwave at full power for 5 mins.
  • Let the cakes rest for another 4 /5 minutes.
  • A cocktail stick inserted should come out dry.
  • Wait for the cakes to cool completely before turning them out and icing them.
    Microwave Coffee Cake


    For the frosting mix all the ingredients and smooth the frosting over the cake . To get best results use a palette knife (which I do not have). I used the star nozzle to decorate the borders.

I think this is a good cake to make for the Christmas holidays

Monday, September 29, 2008

Simply Delicous Eggless Semolina Cake

Eggless Semolina Cake

I have for a long time now been on the lookout for a good recipe for eggless cake and there are a quite a few on the net. Some advise the use of extra baking soda and some instruct you to use sparkling soda water. I even went looking for those egg replacement substitutes in my food store but could not get my hands on any. So I tried my hand at one recipe which had a substantial amount of soda-bi-carb in it. What happened was initially the cake rose beautifully but a few minutes after I had removed iy from the oven it fell flat. So flat that it got a stodgy texture and was simply impossible to eat. Even my 6 year old son who normally eats anything sweet quite happily refused to accept this one. So I gave up on it for some time.

Some days back though when I was planning the menu for a tea time get together for my friends I recollected this awesome eggless semolina cake that my aaji (granny) used to make in a non-stick pan when I was a child. At that time the concept that my aaji could make any kind of cake was itself very amusing to me . I mean I come from a middle class marathi family where cake baking was done only by a few moms in those days so something like that done being done by a grand mom was simply unheard of.

Now to come back to the cake , I remember I loved it and always ended up eating quite a lot of it. So I called my mom in Pune and asked her about it. She said that the recipe was in some old marathi cookbook and she would look it up for me. And so she did .

It's my habit now to try out a certain dish in a small quantity first before cooking it in a larger quantity for entertaining. That's what I did with this one as well and the end result was so good that this recipe has gone into my lists of personal favourites forever. Thanks to you Aaji!!
The only hitch here is that the cake is made with semolina and not flour so it has a grainier texture than an ordinary cake. But believe me it tastes awesome. So do try it out.

Recipe:
1.5 cups semolina,
1 cup milk,
1 cup plain natural yogurt,
1/2 cup butter,
1.5 cups sugar,

1 tspn baking soda,
1 tspn vanilla essence or almond essence (almond essence is lovely),
3 to 4 tblspns of sliced almonds for sprinkling on top (optional),
a pinch of salt

Method:
1. Mix the sugar and yogurt thoroughly so that the sugar completely dissolves,
2. Then add all the other ingredients to the yogurt. Now let this batter stand for an hour. Keep it covered . This enables the semolina to soften completely before baking.
3. Meanwhile pre-heat the oven to 200deg C and grease and line a baking tray with baking paper.
4. After one hour pour the batter into the prepared tray and sprinkle the sliced almonds all over the top. Bake for 20 to 25 minutes until it is golden in colour and a cocktail stick inserted comes out clean . Wait for it to cool before slicing it. If it does not easily come off the tray do not force it out but slice it in the tray itself and remove the slices carefully with a broad knife or a fish slice.

It's a great after school snack or even a lunch box treat for kids. Store it in the fridge after a day and warm it in the microwave for a few seconds every time you serve it. Tastes even better after a day or two.

By the way I did not make this for my last tea party as I was not feeling too well ,but it's a must make next time I have my friends over.

Saturday, May 17, 2008

Golden Orange Cake (Delights of Blogging)


Every now and then while surfing the blogosphere a recipe comes up that catches my fancy to such an extent that I cannot wait to try it out. I am very very impatient to try it out and feel good only after I have made it , tasted it and passed my verdict on it. In my rush to create the new dish I sometimes also oversee the fact that I do not have one or two of the ingredients mentioned in the original recipe. I convince myself that I can substitute something with something else that is available at home at that time. Well what happens is that sometimes my substitutes work and sometimes they are a real flop. But thankfully this time my efforts were rewarded beautifully.

The recipe that caught my fancy this time was Orange Cake from Meeta's What for Lunch Honey. As usual Meeta's photograph of her cake was so enticing that I could practically taste the cake in my mouth just by looking at the pic and secondly the recipe was so simple that even a clumsy baker like me could not have gone wrong . Now the only hitch was I did not have any pudding powder that was in the recipe. Ideally I should have waited for my next trip to the stores and bought some. But no!! I wanted to make that cake on that day itself. So I substituted that pudding powder with cornflour. Thankfully nothing went wrong and I baked the most delicious ,aromatic and soft fluffy cake ever. I also reduced the amount of baking powder.
Meeta's cake has a beautiful orange glaze over it . I kept mine plain as hubby loves plain cakes. But I am going to try the glaze the next time I make it. Her pics are too tempting.

Ingredients:
250g all-purpose flour ,

2.5 teaspoons baking powder,

40g cornflour,

340g sugar,

3 eggs,

80g oft butter - cut in pieces,

2 teaspoons orange zest ,

250ml orange juice


1.Pre-heat the oven at 180 degrees C.
2.Prepare a cake tin by greasing and lining it with baking paper. I used a square one as that's the one I had.
3.Sift flour, baking powder and the pudding powder into a large mixing bowl.
4.Add the eggs, sugar, butter, orange zest and juice to the dry ingredients and whisk into a smooth thick mixture. I did it by hand but do it with a electric cake mixer if you have one.
5.Pour the cake mixture into the cake form, even out with a rubber spatula and bake approx. 40 to 45 minutes. The cake is done when a toothpick or knife is inserted in the middle of the cake and it comes out clean.
6.Take out of the oven and allow to cool a little in the mold itself. Run a knife along the sides of the cake and tip out . Peel off the baking paper.
By now I was dying to taste it and cut my self a large slice to gobble down. Hmmm!! I was in heaven.
Thanks Meeta for this fab recipe .

Tuesday, December 04, 2007

Date and Walnut Cake (Getting into the Christmas Spirit)


Ok Ok I know the last recipe I posted was 3 weeks back and could have posted at least 3 more recipes in these last 3 weeks but I did not. Why Not? I don't know. Call it a Blogger's Block (which sounds so much better than calling it simply Laziness, doesn't it?). Well thankfully I have managed to overcome this block or whatever it was that was keeping me from blogging and here for you is this scrummy yummy Date and Walnut Cake .


Now most of us have read about the Daring Bakers on the Blogosphere. Every time I see there latest beautiful and delicious creation I have this great urge to be one of them, but to tell you the truth I don't think I am up to it, because the title that would really suit me more is Trial and Error Baker. Yes that is what I am . Because all my baking is done on this one principle. In fact in my case it is less Trial and more Error.

The maximum errors I make in my kitchen are during my baking sessions. My husband and son have on so many occasions bravely eaten stodgy cakes and biscuits so hard that you could hit someone with them (and I love them for it) . But persistence pays and sometimes my trials are rewarded with a really good cake and believe me the one you see in the pic above is one of them .

I followed the recipe from The Ultimate Cakebook by Mary Berry who you could say is my Guru in Baking. So here it is:


Stuff you need:
250m gm dates stoned and chopped,
40 gms soft butter,
350 ml boiling water,
2 eggs,
200 gms dark muscovado,
150 gms ground almonds,
150 gms chopped walnuts,
350 gms self-raising flour,
1.5 tspn ground cinnamon.
Method:
1. Preheat oven to 180 Deg C
2. Grease and line a 12x9 inch tray,
3. Measure the dates and butter into a bowl and pour the boiling water over them. Let cool.
4. Beat the eggs and sugar together in a large bowl and then add the cooled date mixture and the remaining cake ingredients one by one . Stir well
5. Pour the cake batter into the prepared tray and bake for 30 to 35 mins . A skewer inserted should come out dry.
6. Let the cake cool completely before slicing it.


Note: This cake tastes even better after a couple of days. Store in the fridge and microwave for a few seconds everytime you serve it

Thursday, June 21, 2007

Polka-Dot Cake


About 10 days ago I went for my fortnightly shop to Sainsbury's. Now when you enter Sainsbury's the first beautiful thing you see are the fresh cut flowers and the next item that is a treat to your eyes is the fresh fruit. On my last trip there I found these beautiful fresh cherries. They were all attractively packed in cute little transparent plastic bags and were just begging to be bought. Well atleast I convinced myself of that and picked myself a bag.


Though the husband is not too fond of them, my son and I love them. But as it turns out my son was not in the MOOD for cherries this time. I admit they had competetion with the grapes in the fruit basket which he simply adores. So it was me who ended eating quite a lot of them. But how many cherries can one eat? I mean after a while even I got tired of them, so I put them in the fridge. But everytime I opened the fridge they sat there so pretty andI knew I had to do something interesting with them so that the son AND the husband would agree to eat them. So I got onto the internet and found the perfect solution on this beautiful site by the name " Joy of Baking"


Some of you might already know about this site, but for those who don't its a must-see. I found this very very simple recipe for Cherry Cake. And that's what I am sharing with you today. But first take a look at the pic


Like it? Well then go ahead and give it a try . Its awesome. I have made a few changes to the recipe. For e.g. I had fewer cherries than the amount specified (the original recipe needs 1 pound of cherries), and secondly I used brown sugar instead of white.


Polka Dot Cherry Cake:

1/2 a pound (454 grams) fresh cherries, pitted


1 1/2 cups (210 grams) all purpose flour

1 1/2 teaspoons baking powder

1/4 teaspoon salt


2 large eggs


3/4 cup (150 grams) granulated white or brown sugar (I used demerara),


1/2 cup (113 grams) unsalted butter, melted and cooled,


1/3 cup (80 ml) milk ,


1 teaspoon pure vanilla extract,


Zest of 1 lemon.


How to proceed:
Preheat oven to 400 degrees F (205 degrees C).


Butter and flour an 9 inch (23 cm) spring form pan and line the bottom of the pan with parchment paper. Set aside.


Rinse, dry, and pit all the cherries. Cut all the cherries in half . Keep aside 1/4 of the cherries (to be placed on the top of the cake during baking) .


In a separate bowl whisk together the flour, baking powder, and salt. Set aside.


Beat the eggs and sugar well (about 3-5 minutes).


Add the melted butter, milk, vanilla, and lemon zest and beat just until incorporated.


Add the flour mixture and stir just until moistened. Gently fold in the pitted cherries (but not the ones you have kept aside for the top of the cake).


Pour the batter into the prepared pan, smoothing the top with an offset spatula.
Bake for 10minutes then remove from oven.


Quickly arrange the remaining cherries, cut side down, on the top of the cake.


Return the cake to the oven and bake for a further 20 minutes or until golden brown and a toothpick inserted into the cake portion comes out clean.


Remove from oven and place on a wire rack to cool slightly.


Serve warm or at room temperature with a dollop of softly whipped cream.


Makes 8 - 10 servings.

Tuesday, June 05, 2007

Its An Absolute First For Me !!!! And Its For You Meeta.


Yes guys this is the first time I have iced a cake at home. Believe me I was nervous. I mean I do not have the right kind of instruments needed (like a palette knife to smoothen the icing or even a proper icing bag) and secondly I had bought so many precious ingredients that I would have been devastated had something gone wrong. But thankfully what came out of it was a cake worth photographing. I am really enthusiastic to do another one now.

This one is for you Meeta for your Big Birthday Bang
Have a Great Birthday!!!


The cake is an eggless version and I followed the recipe for the cake and the vanilla butter icing from my favourite site www.tarladalal.com . If you guys have any good recipes for eggless cakes too I would love to have them.


**********************************************************************


Friday, December 15, 2006

Chocolate Brownies with Caramel Icecream

Well people, Christmas is just around the corner and my neighbourhood is a riot of colourful twinkling fairy lights and beautifully decorated Christmas trees peeping out of people's homes. It almost makes me glad that it gets dark so soon these days. Because come sunset and the entire neighbourhood comes to life with the festive spirit. Its my son's first Christmas in a UK school and he is so excited ,what with the christmas songs he has learnt in school and the rehearsals for the nativity play.

Although we do not really celebrate Christmas at home it is impossible to stay immune to all the gaiety around. And these brownies are a sure proof of my involvement in this festival. I have tried these for the first time ever and they really turned out well. I had read the recipe quite some time back and the only thing that stopped me from making them before was the amount of butter in it,which is quite a lot. So I waited for a really good reason to make them. And what better reason than Christmas. I have made them quite in advance . They freeze beautifully and can be microwaved just before serving.

I have followed this recipe from the book "Simple Cakes" by Mary Berry who you could say is my Guru in Baking.


Chocolate Brownies, originally uploaded by Anupama 72.
You need:
250gms butter softened,
100 gms self-raising flour (if you are using plain flour just add a tspn of baking powder to it.)
375 gms caster sugar,
4 eggs,
75 gms cocoa powder,
100 gms plain chocolate chips (optional)
Procedure:
Grease a rectangular tray (about 12x9x1.5 inches).
Preheat ovento 180 deg C.
Measure all the ingredients into a large bowl and mix thoroughly. Preferably with a hand-held mixer. But it can be done with a wooden spoon.
Spoon the mixture into the prepared tin and spread it out evenly .
Bake for 40 to 45 mins till it gets a crusty top and a skewer comes out clean.
Allow to cool and then store in an airtight container. Freeze them if you want to eat them at a later date.

Thursday, August 17, 2006

Happy Birthday Vaishali!!!!

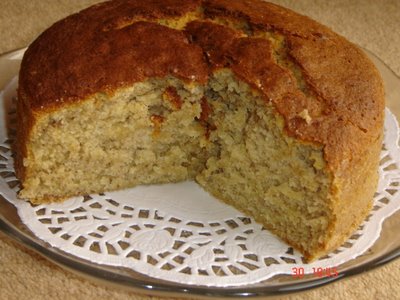
Yes everybody ! It is Thursday the 17th of Aug and Vaishali's birthday today. Yes the same Vaishali (of Happy Burp) we all know who has shared with us innumerable scrumptious recipes and tantalised our senses with beautiful photographs. I am sure all of you would love to join in to wish her a Very Happy Birthday. And thats your cake Vaishali. Its not a show stopper where looks are concerned ,but where taste is concerned it is a winner. I made this delicious Banana Cake specially for your birthday,but I'm going to have to cut it and......eat it too. Sorry about that.


Here's how I made it:
  • 100 gms soft butter,
  • 175 gms caster sugar
  • 2 eggs well beaten
  • 2 ripe bananas mashed
  • 225 gms self- raising flour
  • 1 tspn baking powder
  • 2 tblspns milk
  • 1 tspns vanilla essence

  • Procedure:
  • Pre-heat the oven to 180 deg c.
  • Prepare your cake tin by greasing it with butter and then dust it with flour.
  • Sift the flour and the baking powder together at least twice.
  • Mix all the ingredients in a large bowl for about 2 mins until well blended.
  • Pour the mixture into the baking tin. The tin should only be half filled with batter as the cake rises a lot.
  • Place in the middle rack of the oven and bake for 1 hour. Check the colour of the cake after 1/2 hour . If the top of the cake has browned nicely cover the cake loosely with an aluminium foil and then continue baking for 30 more. After the 1 hr baking time is up insert a knife in the centre of the cake. It should come out dry. if it does'nt, bake for another 5 to 10 mins.
  • Let the cake cool completely before turning it over onto a plate.
  • Cut into thick slices.
  • Wish Vaishali a Happy Birthday and dig in.